15 Easy Nail Designs for Kids to Do at Home
Easy Nail Designs for Kids to Do at Home: Who does not love nail designs these days? Gone are days, when we used single nail polish on fingernails and toenails. Now the trend has changed a lot, nail designing is becoming more creative day by day. From kids to adults, all are hooked up on this nail design trends these days. Especially when it comes to kids, they love decorating their cute small nails.
Nowadays, nail designing salons come up with gorgeous designs. They use various unique tools and machines for creating such great designs. But for moms taking kids to nail designing salon every time is quite a task. Why go to such expensive nail salons, when your kids can DIY nail designing at home. Doing the kid nails designing at home opens door to limitless nail designs and patterns. Also, kids can create matching nails art with their dress or outfits, birthday, party themes and even cartoon characters. The shimmer, glitter, stickers enhance kid’s nail design. Also, this is a great opportunity for your kids to express their creativity through nail designing skills.
Scroll down as I have gathered up 15 easy to do nail design curated just for kids. Also, an easy step by step tutorials is given to make the mom’s work hassle-free.
Easy Nail Design for kids with Pictures
1. Lady Bird Nail Design:
Kids love to play with cute ladybirds in the garden. Especially during summer spring weather ladybirds are mostly found. So take the opportunity to flaunt your lay bird fingernails in this warm weather. Ladybirds are usually red in colour, which pops out as a great nail design. Kids have small nails, just like the shape and size of the ladybird. This will give an illusion of a real small ladybird in their hands. Creating this nail design is very easy, with just 3 nail colours.
Follow these steps to make ladybird nail art:-
- Coat the nails with the bright red nail paint
- Add a horizontal line with black nail polish near the edge of the nails
- Paint the edge of the nail with black nail polish. Draw a vertical line with the same black polish exactly in the middle of each nail.
- Add some small dots with black nail polish.
- With white nail polish add 2 white dots in the center of the black edge.
- Then add smaller black dots in those white dots for making it the eyes of the ladybird.
2. Converse shoe nail art:

Converse shoes are an iconic piece in every kid’s wardrobe. From going to school to play, the converse shoe is favourite of all kids. Sneakers are comfortable yet a fashion statement which comes in various bright color. This nail design can be recreated by using a pointed thin nail brush and a dotting tool.
Follow these steps to make nail art:-
- Apply a bright base coat only ¾th part of each nail.
- In the leftover portion, the top edge of the nail, apply white nail polish. The white edge looks like a French manicure.
- With the help thin nail brush create a crisscross pattern in the middle of the nails. This makes the white shoelace of the sneaker.
- Followed by adding some white dots at each corner of the crisscross.
- After the whole nail design dries, add a coat of clear nail polish.
See Also: Easy Kids Hairstyles Ideas for Little Girls
3. Angry bird nail Art:

Kids have quite a craze for the Angry Birds game. Angry birds game consists of cute little birds and the devil green pigs. The angry birds come in vibrant red, yellow, black, blue and yellow colours. Kids are going to love to recreate this easy cartoon nail design. For precise, a look uses a black nail art pen to draw the eyes and beak of the birds.
Follow these steps to make nail art:-
- Apply the base, of your choice. Preferably kids are a fan of a red angry bird.
- After that, add 2 white small circles with the help of a small brush.
- Inside the white small circles, add a dot of black nail paint. The completes the eye of the angry birds.
- With the help of nail art pen draw the beak and eyebrow.
- Paint the beak with yellow nail polish and a lower portion with white nail paint.
See Also: Easy Kids Face Painting Ideas for Little Girls
4. Hello kitty nail Art:
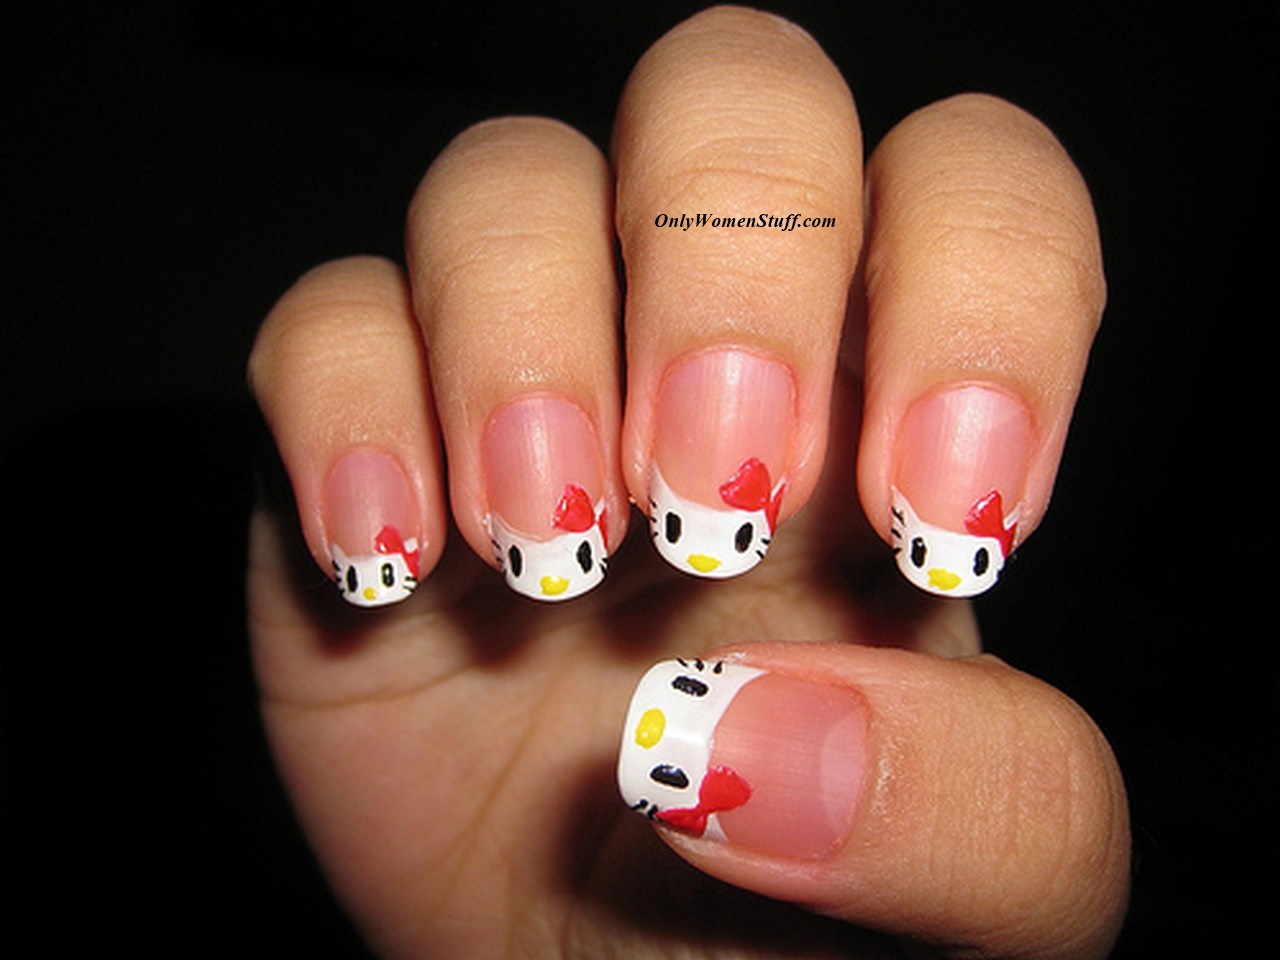
Hello kitty is undoubtedly the famous Japanese cartoon character. Hello kitty merchandises like bags, pencil box, shoes, the water bottle are famous all over the world. Kids who are hello kitty fans would love to have them as nail designs. Kids can decorate their nails with a variety of fancy colours like pink, red, orange and white. The nail design is like a Hello kitty French tip manicure.
Follow these steps to make nail art:-
- Apply a clear base coat to achieve well glossy nails.
- Just add white nail polish in the edge of the nail tips.
- With the help of a sketch nail pen, draw 2 small black dots and 3 small whiskers in the white portion of nail tips.
- For adding a nose, just apply a dot of yellow nail paint at the center the white edge.
- Add a cute little now near one edge. The colorful bow is the signature look of hello kitty.
See Also: Awesome Nail Art Designs for Long Nails
5. Floral nail art:
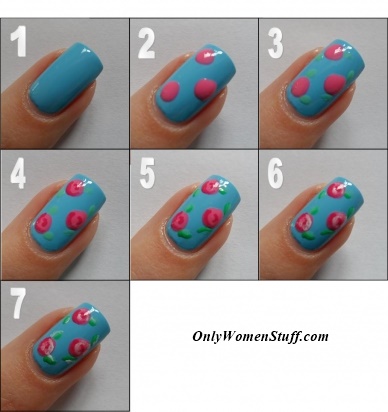
Not only Kids, but we all also love flowers. Flowers are the way of nature’s showing its joy. Adding a floral print design to kids nails, makes it look lovely. So flowers can instantly transform any dull base coat nail polish into a gorgeous nail design. Creating these floral print with small leaves might look difficult. But if you follow my given instruction and use a fine brush, then you can easily create this cute nail art.
Follow these steps to make nail art:-
- Apply preferably a lighter shade base coat.
- For flowers design, incorporate 2 colour. Here use one deep pink to add a small circle.
- After drying of deep pink apply the lighter shade to draw other few petals. This creates a light and shade effect.
- For making the design chicer, draw 2 leaves using dark green and light green nail polishes at the end of each flower.
- When the nail design becomes dry, just add a clear base coat to create a glossy effect.
See Also: NexGen Nails Products
6. Leopard print nail art:

Leopard print nail art is a great one for leopard lovers. Kids love leopard not only because it is the fastest animal. The main attraction is leopard’s body print. This beautiful spotted design does not need to be always done in yellow and black nail paint. As kids love to experiment with various colours, so we have curated a chic peachy nail paint combined with black and white spots.
Follow these steps to make nail art:-
- Apply a peachy nail base coat.
- Add some white spots with a fine brush.
- After the spots dry, add distorted black nail polish spots encircling those white spots.
See Also: Easy and Simple Nail Designs for Beginners
7. Rainbow nail art:
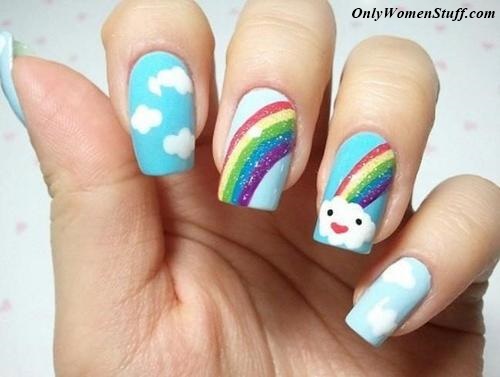
Kids love when they see the rainbow after the rainfall. Those 7 vibrant colour lifts up the child’s spirit. Adding them as nail design is a great way of experimenting with colours. Those 7 colour rainbow helps to stand out kids nail with any casual outfits. Drawing some cloud motifs with faces in the nails design transforms it into the cutest nail design of all. They flaunt this tricky yet easy nail design by following some easy steps
Follow these steps to make nail art:-
- Apply base coat with light blue nail polish.
- Add rainbow with 7 colours strips in both middle and ring finger.
- In the ring finger add extra fun. Draw a cloud with white nail polish.
- Then add eyes with black nail polish and smile with red nail polish to that cloud.
- Also, draw smaller clouds in other fingers.
See Also: Beautiful Short Nail Art Designs & Ideas
8. Zebra stripes nail art:

Animal stripes have been very popular fashion statements always. From clothes to bags, animals stripes are always loved. Kids who are animals, lovers, are excited to flaunt their nails with colourful animals stripes. They not only stick to the usual white or yellow base coat with stripes. They experiment with a funky colour like pink, purple, etc. Even adding some shimmery nail paints makes the nail design more gorgeous. Use a black nail pen for drawing the stripes.
Follow these steps to make nail art:-
- Paint the nails with base coats of vibrant colours.
- After it dries, draw fine stripes like the help of a fine brush.
- Add top coat, after the design dries.
9. Penguin nail art:
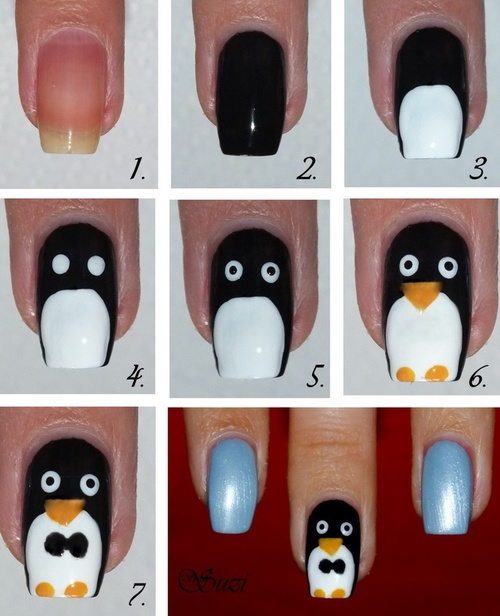
Kids adore the cute penguins. The cute penguin Pingu is a famous cartoon character. Kids enjoy Pingu cartoon series a lot. Making this cartoon character as kids nail design will be great fun.
Follow these steps to make nail art:-
- Add black base coat in the nails.
- Then add white nail paint in an ovoid shape.
- Put 2 white dots to create the eyes.
- Then in the middle of those white dots, add black dots in the middle.
- Add beak and legs with yellow nail polish.
See Also: Best Nail Art Designs Ideas Images
10. Love nail art:
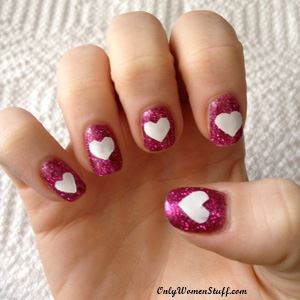
From kids to adult, everyone needs love. Heart shapes are just a way to spreading the love. Heart shapes are the super cute motifs to add in kids nails art. This simple shape comes with various sizes and colours. Just adding a heart shape, instantly changes the look of the nail art. Kids adore the heart shapes in their nail art.
Follow these steps to make nail art:-
- Add a base coat of shimmery or glittery nail paint.
- After it dries, draw a small heart shape in the middle with white nail polish.
- To make the drawing of the heart more convenient, cut out a stencil of heart shape in a sellotape.
- Stick it each nails, paint the heart.
- Pull out the cello-tape stencil, to get a perfect heart shape.
- Add a coat of clear nail polish, after the nail design dries.
See Also: Toe Nail Art Ideas
11. Powerpuff girls nail art:
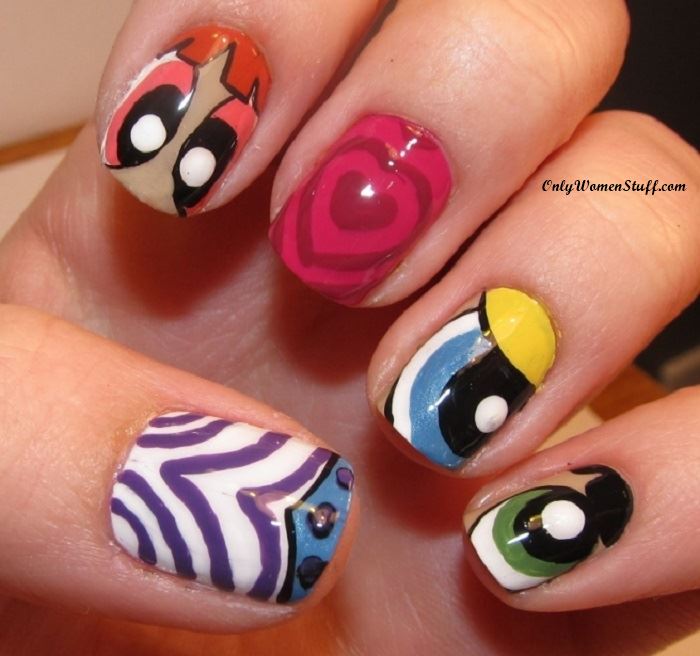
Who does not love the Powerpuff girls? Kids go crazy about this animated cartoon show. Here 3 girls are present who save the city from enemy Mojo Jojo. Powerpuff girls nail design is very popular among kids. They love to flaunt different funky nail design creation. Each of the 3 girls has colour coordination, Blossoms represents red, Buttercup represents green, Bubbles represents yellow. The enemy Mojo Jojo here is represented in violet stripes hat. Using a black sketch nail pen will make the nail design easier to do.
Follow these steps to make nail art:-
- In the index, ring, pinky finger, draw the eyes of the Powerpuff girls.
- Fill the eye of the index finger with red colour and then add a black circle in the middle.
- After it dries, then add a white dot in the middle of the black dot.
- In index finger add orange locks in the tip of the nails.
- Repeat the same steps with the ring and pinky finger. But colour of ring pink is yellow, and the pinky finger is green.
- In the middle finger add a base coat of pink nail polish.
- Then draw a love motif with a deep pink shade. Also, add few love shaped outline in the middle finger.
- In the thumb, the Mojo jojo is drawn. Coat the thumb with white as a base coat.
- Draw blue small tip at the edge of the nail.
- Add a few curve violet stripes in the white portion of the thumb. This creates the look of the hat.
- Then in the blue tip, add 3 black dots.
- After the designs dry out, complete the design by adding a clear top coat.
12. Faux tuxedo nail art:
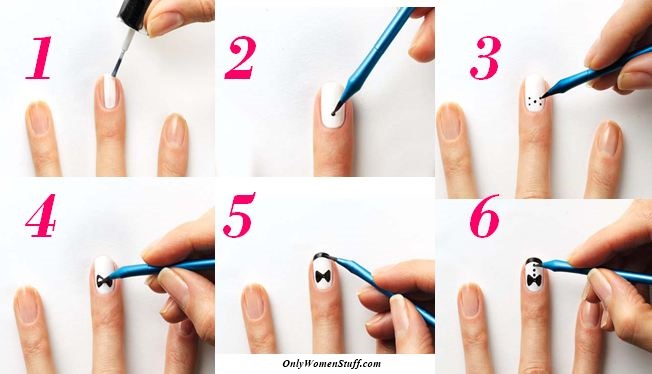
Bow tie and tuxedos are simple motifs that transform any nail design into an elegant one. Not only kids, we all that classy faux tuxedo. The combination of a black faux tuxedo with white shirts fascinates the kids a lot. This nail art grabs all attention in small nails of the kids. This stunning design is very easy to create by following steps by steps tutorials.
Follow these steps to make nail art:-
- Add the white base coat.
- Then add draw the tuxedo using black nail polish.
- Add 3 black doors above the tuxedo. This looks like the button of the white shirt.
- For adding a chic factor, apply black nail polish at the tip of the nails. This gives a look of the French manicure.
13. Stripes nail art:
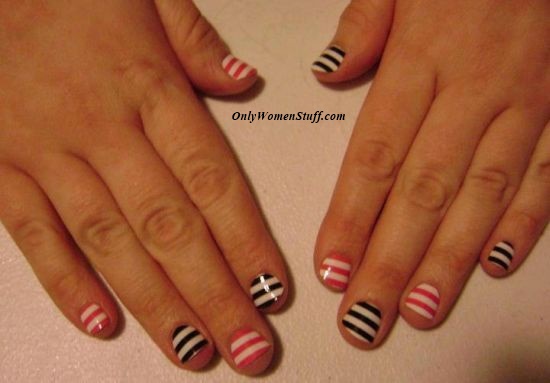
Stripes are a great way of expressing one person style. These simple stripes can instantly recreate a gorgeous nail design. Stripes can be customized according to kids choice. Kids wear various kind of stripes, from horizontal to vertical. Kids usually matching colour stripes and pattern in their nails. Using a nail stripe sticker will help to get fine stripes with ease. Even you can create stripe nail stickers at home, buy cutting fine strips of sellotape or sticky tapes.
Follow these steps to make nail art:-
- Apply the base of your choice. Alternating with base coat colour will add a more chic factor to the nail design. Here black and red combination are done.
- After the base coat dries, apply stripes nail sticker.
- Add the colourful stripes of your choice. Here a fine coat white stripes are drawn using a fine nail brush.
- Make sure to add a coat of clear gel nail polish, after drying of the nail design.
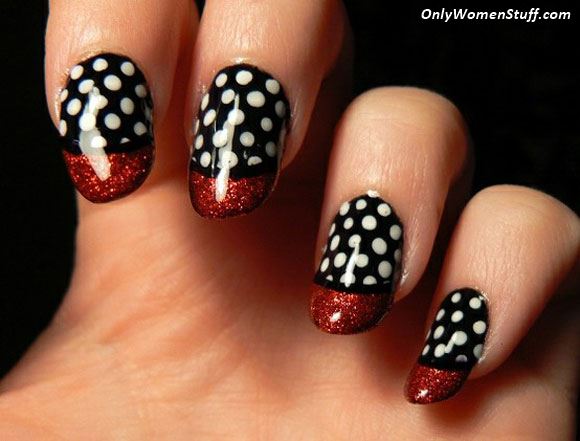
14. Polka dot nail art:
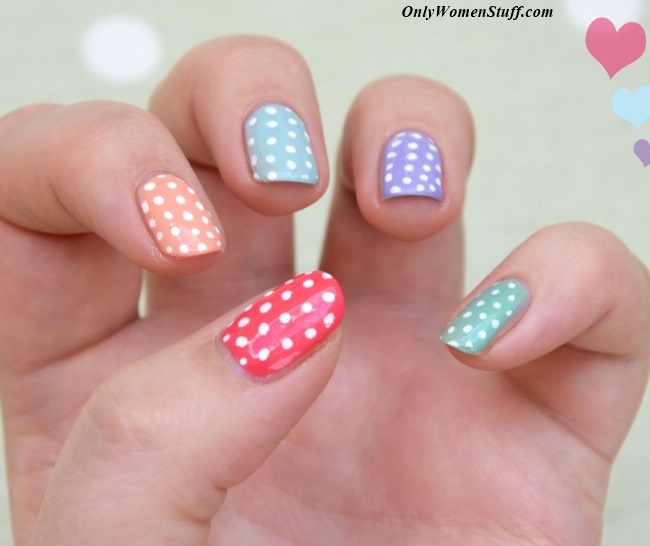
Polka dots are the eternal style statement in the whole world. This instantly creates a chic and funky vibe to the look. Incorporating them as nail art is a great addition to style statement. Kids love to wear polka dot dresses and skirts. This is a great way to create a matching nail art with their outfits. Polka dots come in various sizes and colours. Therefore nail design can be easily customizable according to your choice. This colourful nail art can be simply done with a fine nail polish brush or toothpick.
Follow these steps to make nail art:-
- Apply base coats of different vibrant colours like red, orange, green, blue and violet.
- Add white very small polka dots with the help of a toothpick.
- After drying of the best, coat it with clear nail paint.
15. Pusheen nail art:
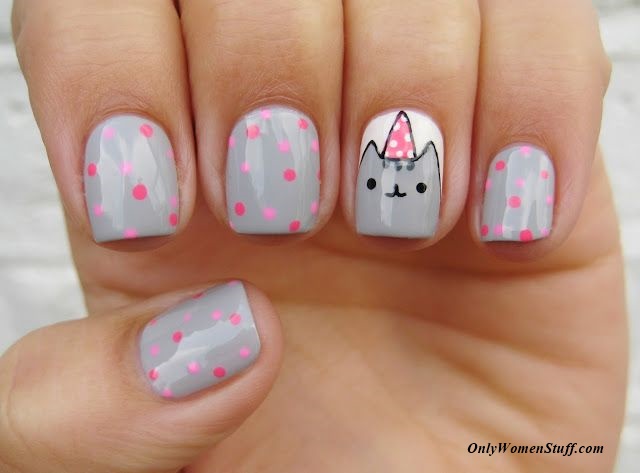
Pusheen is the kid’s most favourite comic cat. It has various cute stickers on Facebook. Kids love to play with chubby little cat’s soft toys and accessories. Pusheen has various sticker looks of like of the unicorn, birthday party and even of eating foods. Kids would love to add the Pusheen cat as their nail design. Add some small pink polka dot in other nails with the pusheen cartoon. This transforms the whole design of the kid’s nails to another level of cuteness.
Follow these steps to make nail art:-
- In the ring finger draw the pusheen cat’s face with grey colour nail paint.
- Add 2 small black dots as Pusheen’s eyes and draw a mouth too.
- Add a small triangular birthday cap in the Pusheen’s head.
- Paint the cap with pink nail paint.
- Add some white polka dots with the help of a toothpick.
- In other fingernails, add the base coat of grey.
- Add small polka dots of deep pink and light pink colour.
- After the whole nail design dries, don’t forget to add a clear top coat to have shiny nail design.
Final thoughts
So Moms after reading this, no need to worry about doing kids nail design. I hope this innovative variety of nail designs solve all your concerns and helps your kids too. As mentioned above, you don’t always need to go to expensive nail salons. With a few tips and tricks, your kid can easily create these gorgeous nail art at home.
Posts You May like to Read:
- Smokey Cat Eye Makeup Tutorial
- Beautiful Henna Mehndi Designs for All Events
- Best Prom Dresses for your Special Night
- Best Earrings for Baby Girls with Safety Backs


